Claw Clasp Closure

Please consider making a donation if you find this tutorial useful.

The claw clasp closure demonstrated in this tutorial includes the findings pictured to the left.  The horseshoe shaped findings are wire protectors.  Next are the tube crimps, then split rings in two sizes and the swivel claw clasp.  I use two sizes of split rings because it is easier to close the clasp over a larger split ring and I use a smaller split ring to secure the claw clasp because it lays better on the neck and a larger one is not necessary.  I use split rings because they are more secure than jump rings and if I ever want to switch out the clasps it will be possible without restringing the necklace.

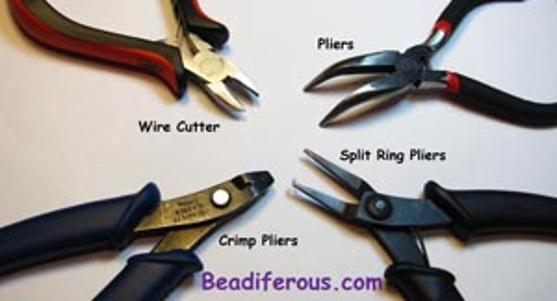
These are the tools that you will need to complete the claw clasp closure.  Use the wire cutter to cut your stringing wire, don't use scissors.  Pliers assist with adding the split rings and pulling the stringing wire taught.  Crimp pliers are needed for closing the crimp but are not absolutely necessary.  If you don't have crimp pliers you can pinch the crimp closed with pliers, but it won't look as nice.  Split ring pliers are needed to open the split ring quickly and neatly.

First slide the crimp onto the wire, then slide the wire through the wire protector around the loop and through the other side.  Slide on the large split ring before slipping the wire back through the crimp.  Using notch 2 carefully squeeze the two ends of the wire protector until they touch.

Closing a crimp takes 2 steps.  Step 1 places a notch in the crimp, step 2 folds the crimp in half and squeezes it.

Step 1 - The notch is placed in the crimp.  The wire protector tend to force the wire to cro.ss under the crimp.  Force the wire parallel so the notch is placed in the crimp between the wires.

Step 2 - Move crimp to notch 2 twisting 1/2 turn.  Slowly tighten the crimp so it folds back on itself.  Ever so carefully squeeze the crimp a bit tighter using the flat space after notch 2.  If you squeeze too hard the crimp will crack and fall off.

Tug on the wire to make sure it is tightly crimped. 

Slide the beads up the wire up to the crimp.  If the wire end can fit into the beads then slide the beads over both wires, otherwise cut off the wire close to the crimp tube.

Using the split ring pliers open the split ring and slide it onto the clasp.


The point on the split ring forces the split ring open just far enough to slide on the clasp.

Prepare the other side by sliding on the crimp, sliding the wire through the wire protector, around the loop and back down the other side.  Slide on the split ring/clasp combo and then slide the wire back through the crimp.  Carefully squeeze the ends of the wire protector together using notch 2 on the crimp pliers.

Slide the end of the wire through the last couple beads.  Grip the end of the wire with pliers and pull until the beads are snug up against the crimps on both ends of the necklace.  Secure the crimp as described above.

 Cut off the wire and push the end into the next bead.

Here is the finished claw clasp closure.

Please consider making a donation if you found this tutorial useful.