Embellish12-Bead Base
Please consider making a donation if you find this tutorial useful.

This tutorial describes how to embellish the 12-bead base described in the previous tutorial. As described in the 12-bead base tutorial the base bead is made up of 4-bead sections and 3-bead sections. The seed beads are added between the 4-bead sections and the bicones are added between the 3-bead sections (shown).
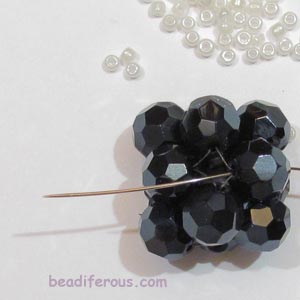
To begin, gather your seed beads and your focal beads; in this project I used 4mm bicones.
For stringing material I used 48 inches of 6-pound Fireline in white.
This slide shows a 4-bead section.
The beaded bead consists of the following steps:
Step 1 - Make the 12-bead base.
Step 2 - Add seed beads between each 4-bead section.
Step 3 - Add bicones between each 3-bead section.
Load the Fireline onto your needle and pass the needle through one of the base beads.
The first step is to add 3 seed beads between each bead in the 3-bead section. Add 3 beads to your thread and pass through the next bead.
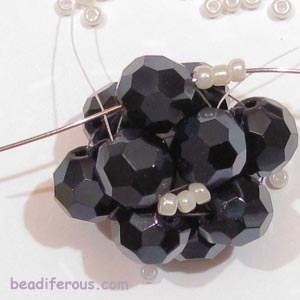
Continue through the 3 beads in the 3-bead section.
This slide shows the first 3 stitches. Leave the tail so you can tie off the project when complete.
Note: The seed bead on either side of each base bead should be treated as though they are one. The center seed bead will be used in step 3 to add the bicones between the 3-bead sections.
To complete the round pass the needle through one seed bead. Tighten. Now the round is complete.

Add 2 seed beads to your needle this time and pass through the next base bead. This time you only needed to add 2 seed beads because one was already there.
Note: Some stitches will require 2 beads and some will require only 1 seed bead to be added.
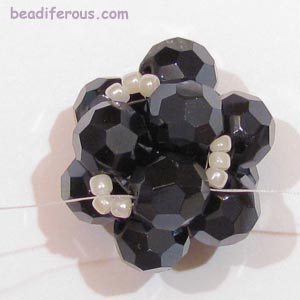
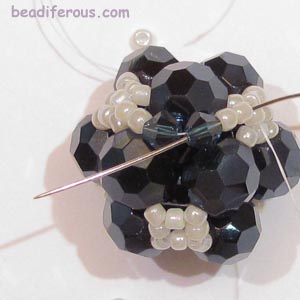
When complete there will be 8 beads between each 4-bead section. (Picture 3 rows of 3 with the center bead removed leaving 8. See Below.)

Continue adding beads around the entire base bead. Sometimes the thread will not be in the right location. You just need to pass through several beads until you get to the right place to begin your next stitch. You continue stitching until you have all six 4-bead sections completed.

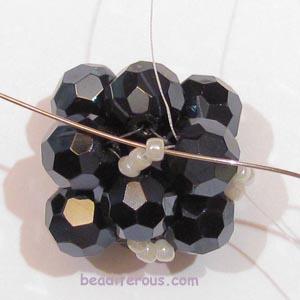
This slide shows adding the last bead. Please take notice of the needle passing through the seed bead, base bead, seed bead combination. Tighten.

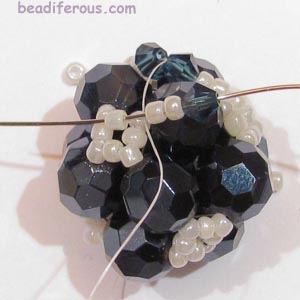
Here is the project after completing step 2. See how the seed beads adjacent to the base beads are flush with the base bead. Also notice the center seed bead which will be used in step 3 to stitch the bicone segments.
Step 1 and 2 can be completed at the same time by incorporating the seed beads with the base beads. I decided to prepare this tutorial with the two steps separated due to ease of instruction. After making several beads using the 3 step process you will be more than ready to combine the first two steps.

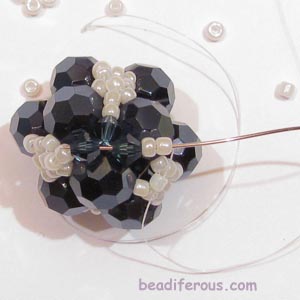
Step 3 - Adding the bicone segments between the 3-bead sections.
Pass the needle through the center seed bead to begin.
Note: There are 3 bicone segments between each 3-bead section. The thread will pass through each bicone segment 2 times.
Each segment consists of 2 seed beads and a bicone.

Add 2 seed beads, 2 bicones, 2 seed beads to your needle and stitch through one of the other center seed beads in the 3-bead section as shown. Tighten
Stitch back through 2 seed beads and 1 bicone completing the first segment. Tighten.
Add a bicone and 2 seed beads and stitch through the remaining center bead in this 3-bead section.
Stitch back through 2 seed beads and 1 bicone to complete segment 2.
To complete segment 3 pass the needle through the remaining bicone and 2 seed beads and back through the center seed bead added in step 2. Make sure you go the opposite direction through the center seed bead. Tighten.

This slide shows the project at this point. Note the white thread in the bicones how it goes through each segment twice.
Continue this process for all the 3-bead sections surrounding the 4-bead section.
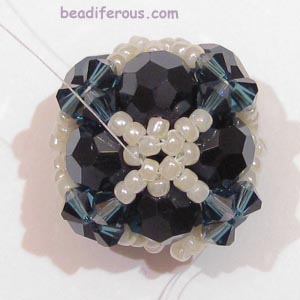
This is the project after adding the bicone segments to half of the bead around the 4-bead section.
Now you will need to pass the needle through beads to get to the opposite side of the bead to position the thread for the second half.
After completing the second half pass the needle through beads until it meets the tail. Tie off with a surgeons knot and cut off ends.

This slide shows the completed bead from the 4-bead section view point.
This slide shows the completed bead from the 3-bead section view point.
Send me pictures of your completed pieces and I will add them below for others to see.
Please consider making a donation if you found this tutorial useful.